https://github.com/mbaljeetsingh/Ionic-jokes-app-with-laravel5-api
In this tutorial we will be creating an app with ionic framework (a brilliant mobile app development framework by drifyco). We will be using the api that i have created in my previous blog post to get data from the server which is created in Laravel5. In this blog post i will be covering many topics like setting up ionic, setting up sass, auth, crud, ionic pull to refresh, ionic infinite scroll etc.
The API endpoints are as follows,
 So without further due, let’s get started.
Creating Ionic Project
For Creating Ionic Project, first make sure you have nodejs installed. If it is installed you are good to go. Now run the following command.
npm install -g cordova ionic
It will install both the cordova and ionic in your system globally due to -g sign we added in the command, which means you can now use cordova and ionic commands from any directory in your system.
Now, ionic provides various templates to use as a starter projects. So we will use one of them. Switch to any directory where you want to create the ionic project and run the following command.
ionic start ionic_jokes sidemenu
Where ionic_jokes is the name of your project and will be used as a directory name for your project

Testing App
We have two options for testing the app, we can either use our browser (chrome, firefox) to test the app or we can use emulator/physical device. Unless you are not using any device specific feature, i would suggest you stick to browser for the testing purpose (easiest one).
Ionic Serve
Now switch to the just created project directory and run the follwing command.
ionic serve
What this command will do, it will start a live reload server and now you can see your app running in the browser. As you can see in the console, in my case it is running at http://localhost:8000
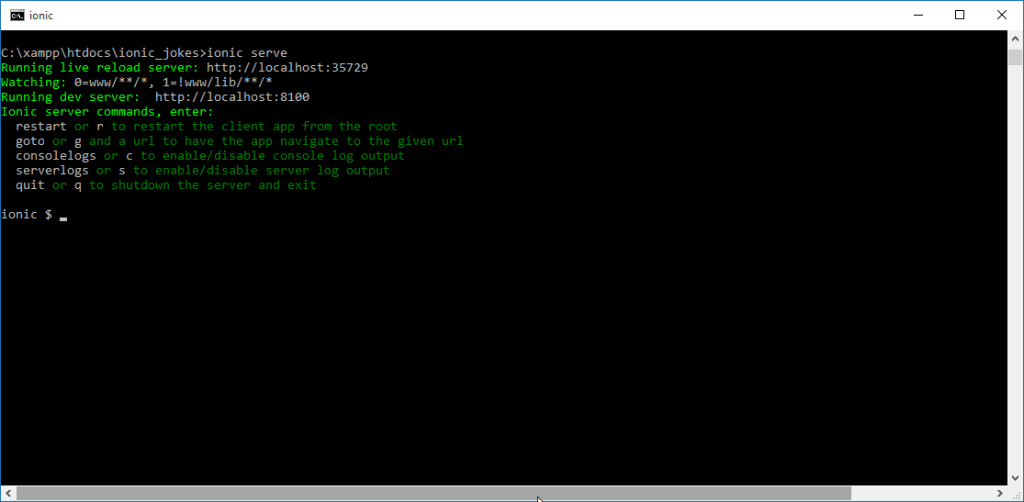
The app in the browser will look similar to this. Now what this live reload server will do, it will see the files for changes if any change happens it will reload the browser page. So no need to refresh the page again.

Ionic Run
Now the second option is to test the app in the emulator or actual device. For this first you need to install the development tools for the specific platform, like if you are developing for android then you need to download and install android sdk and android development tools. There are various tutorials that can help you with how to install and setup your system for android and ios development. So check them too.
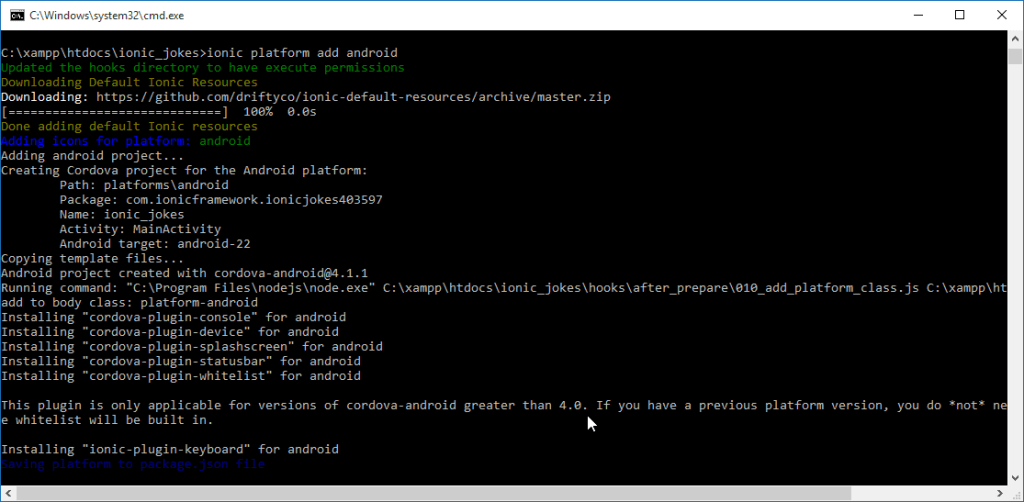
Now i am assuming you have installed android sdk and android development tools on your machine (mine is windows machine, only because i can’t afford mac). Actually, windows is not that bad. So, the next step is to add the android platform to the ionic project. For this run the following command.
ionic plaftform add android
If everything went perfectly, you will see a screen similar to this.
Now after adding the platform you can connect your android device to your system. Make sure developer mode and usb debugging are on and the device specific drivers are installed on the system (windows). Now run the following command.
ionic run android
What this command will do is, it will build and run the app on your physical device. But if you don’t have physical device, then you can use android emulator, that you can create by going to AVD manager. After creating new virtual device. First you need to run the virtual device and then you can run the following command.
ionic emulate android
After running this command, you can see your app running in the emulator. But i would prefer browser or physical device. Emulator is very sluggish.
Setting Up Sass
Now we will setup Sass, if you don’t know about Sass, you should definitely check it out. It is a CSS preprocessor, whatever you write in Sass will be compiled to CSS in the end. But it gives extra advantage like we can use variables, functions etc. Ionic also encourages to use sass. So to setup Sass, run the following command.
ionic setup sass
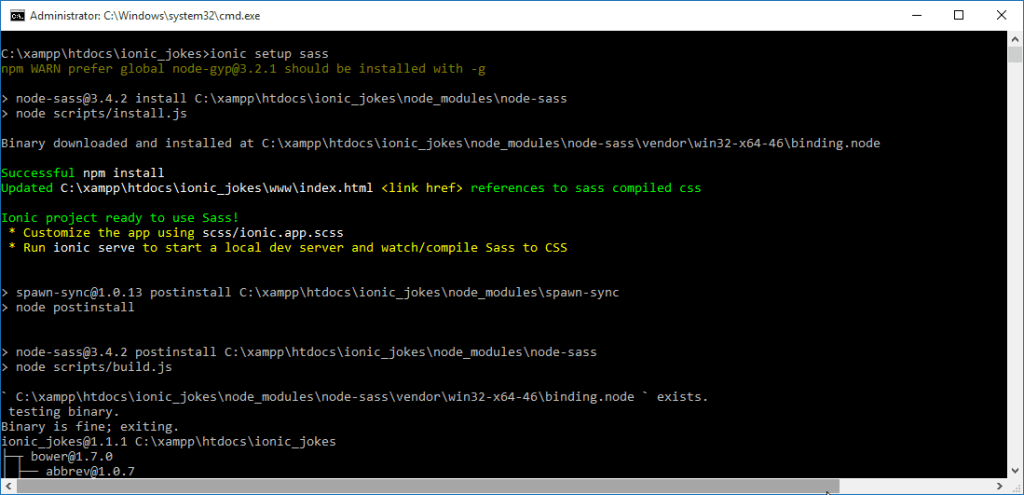
It is not mandatory to use sass with ionic. But it should be used.
Let’s see an example of how Sass can be beneficial. We will be using simple Sass variable to update the app top bar colors.
Open the ionic.app.scss file and add the following variable.
$stable: #59abe3 !default;
You can now run ionic serve and you can see your app will now look similar to this.
Now wherever we have used that stable color in the app, it will be changed to new color. That is the simplest thing Sass can do.
Creating Routes
Throughout the app, the folder that you will be most interested in is www
Ionic uses ui-router by default so if you are not familiar with it. You need to have a look at it first. But it is very easy to learn if you are familiar with angular’s default router. We will create two new routes, one for auth and one for jokes. For this open the app.js and add the following code snippet.
  .state('app.auth', {
    url: '/auth',
    views: {
      'menuContent': {
        templateUrl: 'templates/login.html',
        controller: 'AuthCtrl'
      }
    }
  })

  .state('app.jokes', {
    url: '/jokes',
    views: {
      'menuContent': {
        templateUrl: 'templates/jokes.html',
        controller: 'JokesCtrl'
      }
    }
  })
Now you need to create the login and jokes templates and AuthCtrl and JokesCtrl. For creating the templates go to www/templates folder and add login.html and jokes.html and add the following code.
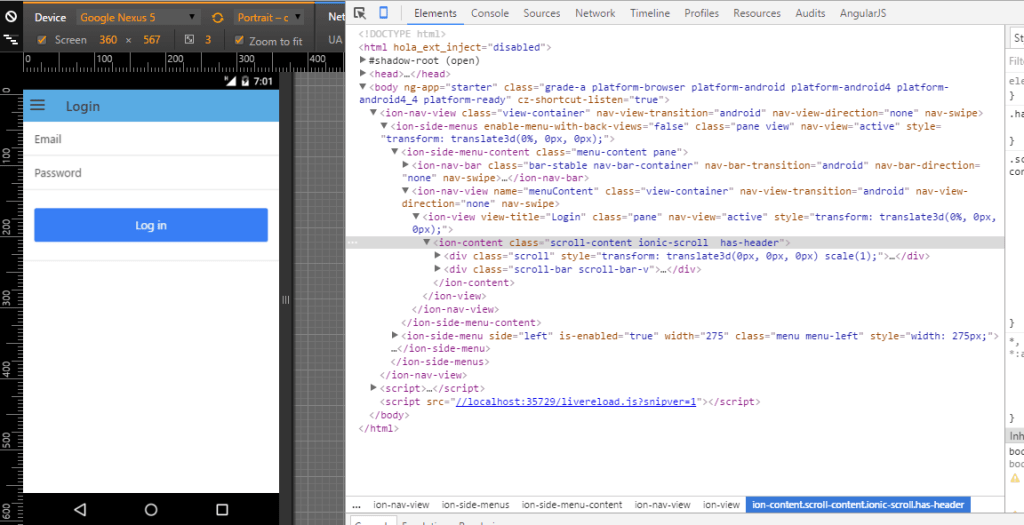
<ion-view view-title="Login">
  <ion-content>
    <form ng-submit="login()">
      <div class="list">
        <label class="item item-input">
          <span class="input-label">Email</span>
          <input type="text" ng-model="loginData.email" />
        </label>
        <label class="item item-input">
          <span class="input-label">Password</span>
          <input type="password" ng-model="loginData.password" />
        </label>
        <label class="item">
          <button class="button button-block button-positive" type="submit">
            Log in
          </button>
        </label>
      </div>
    </form>
  </ion-content>
</ion-view>
<ion-view view-title="Jokes">
  <ion-content>
    <ion-list>
      <ion-item ng-repeat="joke in jokes" class="item item-text-wrap">
        <h2>{{joke.joke}}</h2>
      </ion-item>
    </ion-list>
  </ion-content>
</ion-view>
Now the next step is to create the controllers AuthCtrl and JokesCtrl. Open the controllers.js file and add the following code.
.controller('AuthCtrl', function($scope){

})

.controller('JokesCtrl', function($scope){
    $scope.jokes = [
      { joke: 'First Joke', id: 1 },
      { joke: 'Second Joke', id: 2 },
      { joke: 'Third Joke', id: 3 },
      { joke: 'Fourth Joke', id: 4 },
      { joke: 'Fifth Joke', id: 5 },
      { joke: 'Sixth Joke', id: 6 }
    ];
})
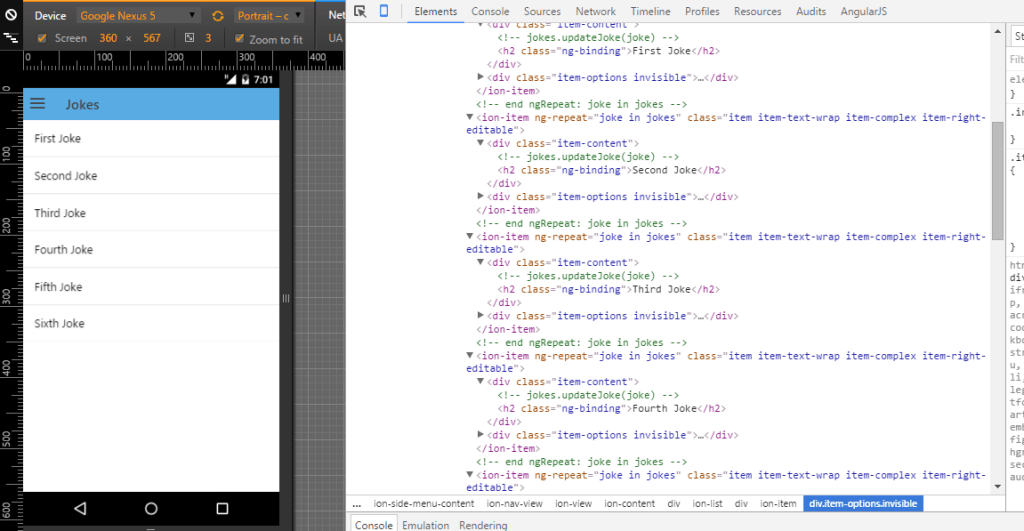
Now run the ionic serve and see the output.
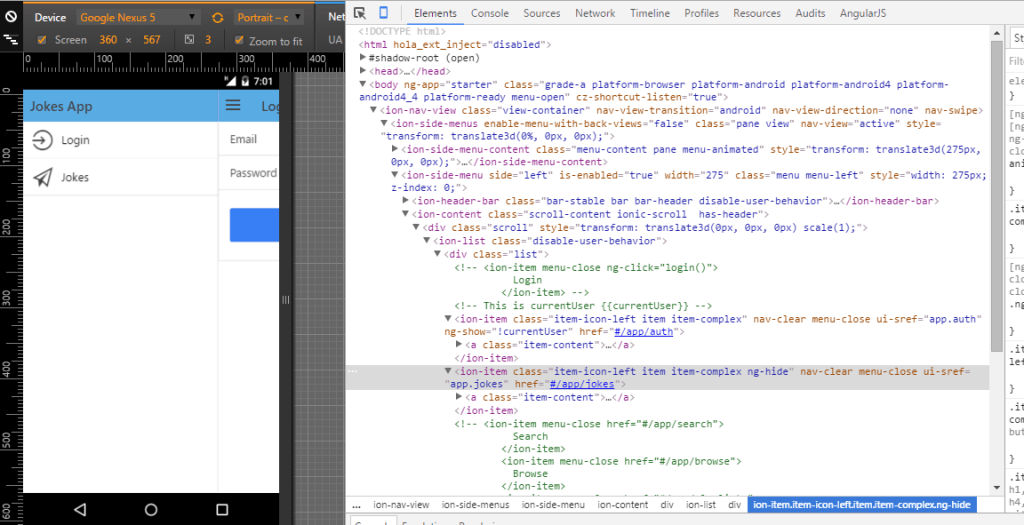
The /jokes route will look like this
and the /auth route will look like this.

Now we will update the sidemenu, to update it open the menu.html and update the ion-list with this snippet.
<ion-item class="item-icon-left" nav-clear menu-close ui-sref="app.auth">
  <i class="icon ion-log-in"></i>
  <h2>Login</h2>
</ion-item>
<ion-item class="item-icon-left" nav-clear menu-close ui-sref="app.jokes">
  <i class="icon ion-paper-airplane"></i>
  <h2>Jokes</h2>
</ion-item>
Now the sidemenu will look similar to this.
Ionic Auth (With Satellizer)
For authentication, we will use a token based authentication moude for angular called satellizer. The benefit of Satellizer is that when the user is logged in, a token is saved to the local storage. We know that to make request to our laravel api we need token every time, Satellizer makes sure to send the token with each request. So we don’t have to send the token manually. let’s first start by including satellizer to our project by running,
bower install satellizer --save
Now, we need to include the satellizer script. Open index.html and add the script as follows:
<script src="lib/satellizer/satellizer.min.js"></script>
Now we need to inject the satellizer as a dependency in app.js as,
angular.module('starter', ['ionic', 'starter.controllers', 'satellizer']);
Now update the config function in app.js as follows,
.config(function($stateProvider, $urlRouterProvider, $authProvider) {

  $authProvider.loginUrl = 'http://localhost:8000/api/authenticate'; //or whatever your api url is
The $authProvider is available via satellizer.
Now open the controllers.js and update the AuthCtrl as follows,
.controller('AuthCtrl', function($scope, $location, $stateParams, $ionicHistory, $http, $state, $auth, $rootScope) {

        $scope.loginData = {}
        $scope.loginError = false;
        $scope.loginErrorText;

        $scope.login = function() {

            var credentials = {
                email: $scope.loginData.email,
                password: $scope.loginData.password
            }

            console.log(credentials);

            $auth.login(credentials).then(function() {
                // Return an $http request for the authenticated user
                $http.get('http://localhost:8000/api/authenticate/user').success(function(response){
                    // Stringify the retured data
                    var user = JSON.stringify(response.user);

                    // Set the stringified user data into local storage
                    localStorage.setItem('user', user);

                    // Getting current user data from local storage
                    $rootScope.currentUser = response.user;
                    // $rootScope.currentUser = localStorage.setItem('user');;

                    $ionicHistory.nextViewOptions({
                      disableBack: true
                    });

                    $state.go('app.jokes');
                })
                .error(function(){
                    $scope.loginError = true;
                    $scope.loginErrorText = error.data.error;
                    console.log($scope.loginErrorText);
                })
            });
        }

})
You can see we have used this code snippet in the AuthCtrl
$ionicHistory.nextViewOptions({
  disableBack: true,
});
What this snippet does is, when the user goes from one route to next, ionic by default adds back button, we don’t want back button to be added when we go from /auth to /jokes. Because we don’t want the user of the app to go back to auth again.
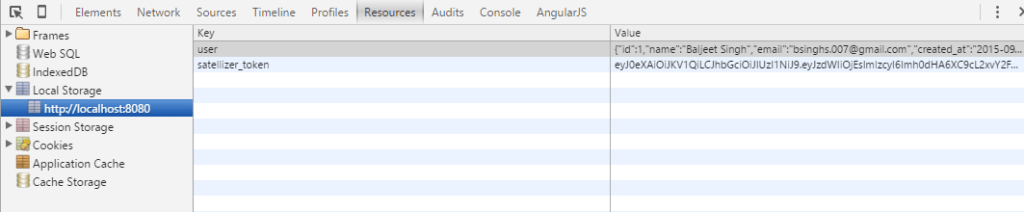
Now, run ionic serve and go to /login route and try login with correct credentials, if everything worked perfectly, you can see the token in the browser local storage and you will be redirected to /jokes route
CRUD Operations I have explained crud operations in my previous angular post. So i am pasting the snippets here. The jokes controller and its template will look like this.
.controller('JokesCtrl', function($scope, $auth, $http, $ionicPopup) {

  $scope.jokes = [];
  $scope.error;
  $scope.joke;

  $scope.listCanSwipe = true;

  // Update Popup
  $scope.updatePopup = function(joke, label) {
    console.log(joke,label);
  $scope.data = joke;

  var myPopup = $ionicPopup.show({
    template: '<input type="text" ng-model="data.joke">',
    title: 'Update Joke',
    // subTitle: 'Please use normal things',
    scope: $scope,
    buttons: [
      // { text: 'Cancel' },
      {
        text: '<b>'+label+'</b>',
        type: 'button-positive',
        onTap: function(e) {
          if (!$scope.data.joke) {
            e.preventDefault();
          } else {
            return $scope.data;
          }
        }
      }
    ]
  });
  myPopup.then(function(res) {
    $scope.updateJoke(res);
    console.log(res);
  });
 };

  $scope.init = function() {
                $scope.lastpage=1;
                $http({
                    url: 'http://localhost:8000/api/v1/jokes',
                    method: "GET",
                    params: {page: $scope.lastpage}
                }).success(function(jokes, status, headers, config) {
                    $scope.jokes = jokes.data;
                    $scope.currentpage = jokes.current_page;
                });
            };
    $scope.addJoke = function(joke) {

      console.log("add joke: ",joke);

        $http.post('http://localhost:8000/api/v1/jokes', {
            body: joke,
            user_id: $rootScope.currentUser.id
        }).success(function(response) {
            $scope.jokes.unshift(response.data);
            console.log($scope.jokes);
            $scope.joke = '';
            console.log("Joke Created Successfully");
        }).error(function(){
          console.log("error");
        });
    };

    $scope.updateJoke = function(joke){
      console.log(joke);
      $http.put('http://localhost:8000/api/v1/jokes/' + joke.joke_id, {
            body: joke.joke,
            user_id: $rootScope.currentUser.id
        }).success(function(response) {
            console.log("Joke Updated Successfully");
        }).error(function(){
          console.log("error");
        });
    }

  $scope.deleteJoke = function(index, jokeId){
      console.log(index, jokeId);

        $http.delete('http://localhost:8000/api/v1/jokes/' + jokeId)
            .success(function() {
                $scope.jokes.splice(index, 1);
            });;
    }

    $scope.init();
});
You can easily move most of the code to factory/service, if you like. For the sake of simplicity, i am placing everything in controller.
And the jokes.html template will look like this.
<ion-view view-title="Jokes">
  <ion-content>
    <div class="list list-inset">
      <label class="item item-input">
        <input type="text" placeholder="Add new joke.." ng-model="joke" />
      </label>
      <button
        class="button button-block button-positive"
        ng-click="addJoke(joke)"
      >
        Add Joke
      </button>
    </div>

    <ion-list can-swipe="listCanSwipe">
      <ion-item ng-repeat="joke in jokes" class="item item-text-wrap">
        <h2>{{joke.joke}}</h2>

        <ion-option-button
          class="button-positive"
          ng-click="updatePopup(joke, 'Update')"
        >
          <!-- Edit -->
          <i class="icon ion-edit"></i>
        </ion-option-button>

        <ion-option-button
          class="button-assertive"
          ng-click="deleteJoke($index, joke.joke_id)"
        >
          <!-- Delete -->
          <i class="icon ion-trash-a"></i>
        </ion-option-button>
      </ion-item>
    </ion-list>
  </ion-content>
</ion-view>
Now you can run the server again and you can see the output will look similar to this.
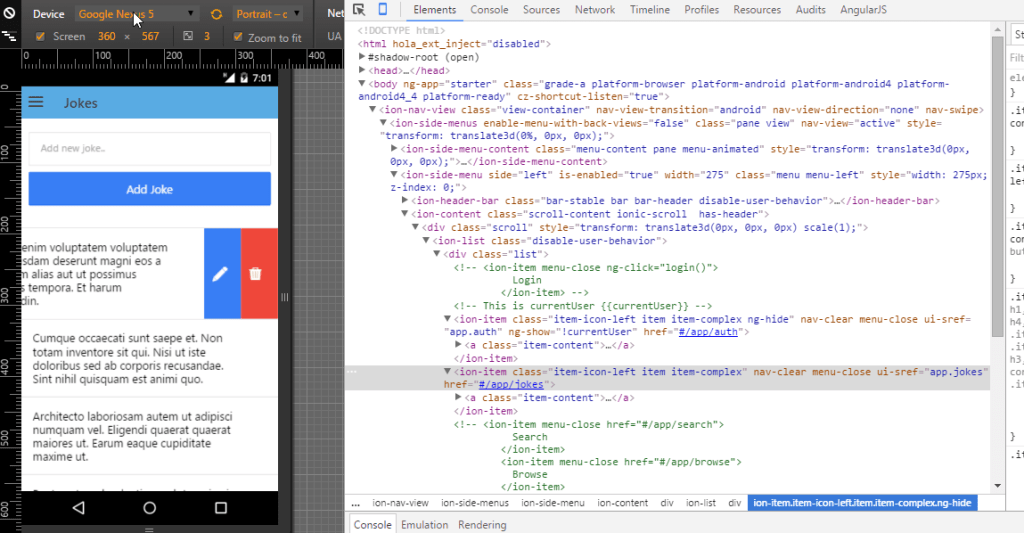
Now your app is fetching data from the actual server. We can view all the jokes, create new joke, edit the joke and delete the joke. For editing and deleting you need to swipe on any joke.
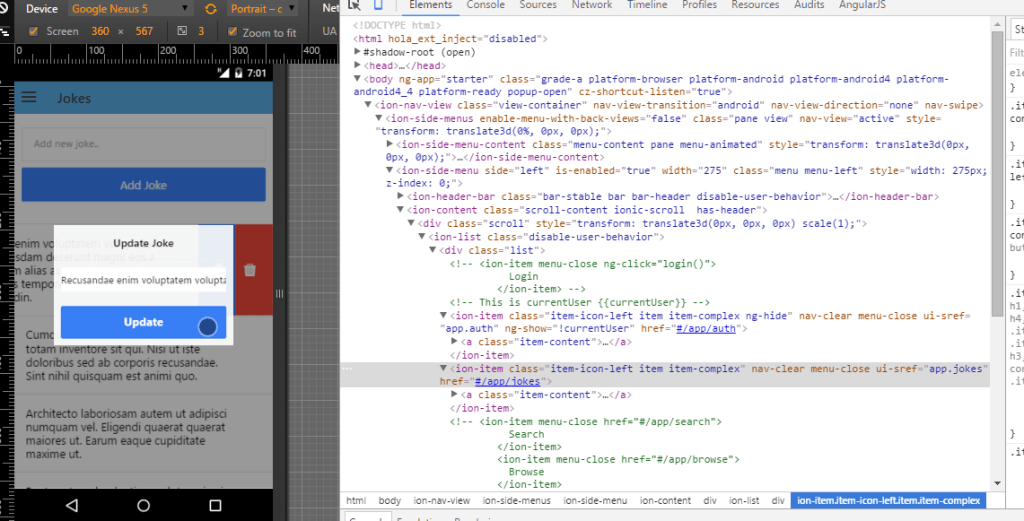
For editing a joke, i am using ionic service called $ionicPoup and the popup looks like this.
Securing Routes
Now our app is working well, but there is one flaw. We are authenticating the user from the server and fetching and showing the jokes from the server. But we can see that, if the user is not authenticated, he/she can still go to /jokes route and if the user is authenticated, he/she can still go to the /auth route. We don’t want this to happen in our app. So we need to secure our routes.
For securing routes we will use a angular package called angular-permission, so let’s start by installing the package.
bower install angular-permission --save
Now include the angular-permission script in the index.html
<script src="lib/angular-permission/dist/angular-permission.js"></script>
Now we need to add the permission module to the app.js dependencies array, now it is look like this.
angular.module('starter', [
  'ionic',
  'starter.controllers',
  'satellizer',
  'permission',
]);
Now we need to define roles, so defining roles, Add this snippet to the .run function in app.js
// Define anonymous role
Permission.defineRole('anonymous', function (stateParams) {
  // If the returned value is *truthy* then the user has the role, otherwise they don't
  // var User = JSON.parse(localStorage.getItem('user'));
  // console.log("anonymous ", $auth.isAuthenticated());
  if (!$auth.isAuthenticated()) {
    return true; // Is anonymous
  }
  return false;
}).defineRole('isloggedin', function (stateParams) {
  // If the returned value is *truthy* then the user has the role, otherwise they don't
  // console.log("isloggedin ", $auth.isAuthenticated());
  if ($auth.isAuthenticated()) {
    return true; // Is loggedin
  }
  return false;
});
Here we are defining roles for the anonymous and logged in users. $auth is available via satellizer. Now we need to update the routes code accordingly. Open app.js and update the routes as.
.state('app.auth', {
    url: '/auth',
    data: {
        permissions: {
          except: ['isloggedin'],
          redirectTo: 'app.jokes'
        }
      },
    views: {
      'menuContent': {
        templateUrl: 'templates/login.html',
        controller: 'AuthCtrl'
      }
    }
  })

  .state('app.jokes', {
    url: '/jokes',
    data: {
        permissions: {
          except: ['anonymous'],
          redirectTo: 'app.auth'
        }
      },
    views: {
      'menuContent': {
        templateUrl: 'templates/jokes.html',
        controller: 'JokesCtrl'
      }
    }
  })
Which means /jokes route will only be available to the users who are logged in.
Also we need to update the menu.html ion-list as follows:
<ion-item
  class="item-icon-left"
  nav-clear
  menu-close
  ui-sref="app.auth"
  ng-show="!currentUser"
>
  <i class="icon ion-log-in"></i>
  <h2>Login</h2>
</ion-item>
<ion-item
  class="item-icon-left"
  nav-clear
  menu-close
  ng-click="logout()"
  ng-show="currentUser"
>
  <i class="icon ion-log-out"></i>
  <h2>Logout</h2>
</ion-item>
<ion-item
  class="item-icon-left"
  nav-clear
  menu-close
  ui-sref="app.jokes"
  ng-show="currentUser"
>
  <i class="icon ion-paper-airplane"></i>
  <h2>Jokes</h2>
</ion-item>
Also, let’s add the code for logout function in the app.js run function as,
$rootScope.logout = function () {
  $auth.logout().then(function () {
    // Remove the authenticated user from local storage
    localStorage.removeItem('user');

    // Remove the current user info from rootscope
    $rootScope.currentUser = null;
    $state.go('app.auth');
  });
};
Also we can get the current logged in user data with this code snippet. It needs to be added in app.js run function.
$rootScope.currentUser = JSON.parse(localStorage.getItem('user'));
This localstorage item is populated when the user logs in.
Now you can run the app, and can see if the user is not logged in we cannot go to /jokes route. Also, if the user is logged in you cannot go back to /auth route.
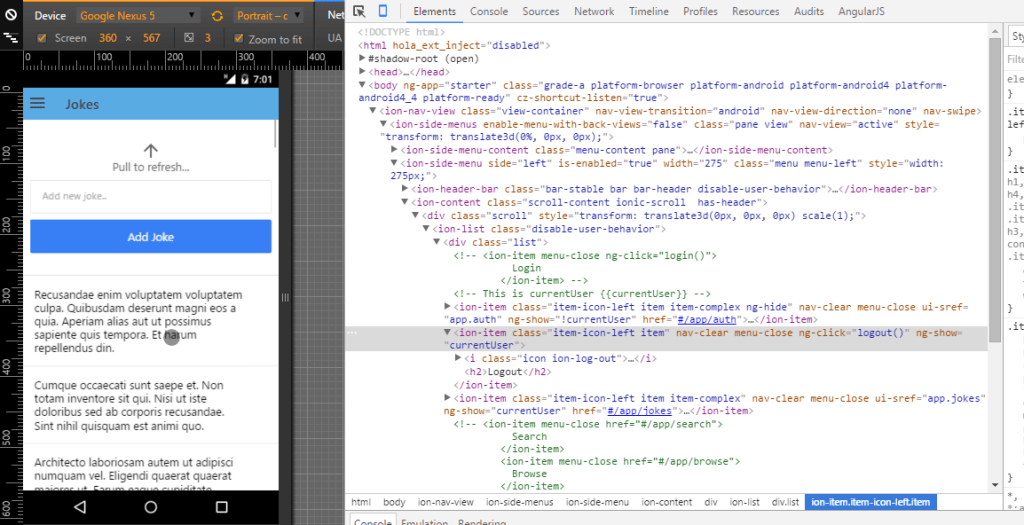
Adding Pull to refresh functionality
The pull to refresh functionality is very common these days in apps. Like, when we swipe from the top we want to load the new or updated content from the server. For adding pull to refresh, ionic provides a smart directive called ion-refresher . So to use it first we need to add ion-refresher in our view jokes.html
<ion-refresher pulling-text="Pull to refresh..." on-refresh="doRefresh()">
</ion-refresher>
You can see here on refresh we are calling doRefresh method, so open the controllers.js and add this method to JokesCtrl as follows,
$scope.doRefresh = function () {
  $scope.init();
  $scope.$broadcast('scroll.refreshComplete');
};
Now the output will look similar to this,
Adding Ionic infinite scroll We would never want our app to load all the data from our server at once. So normally what we do is, we paginate results. For this ionic uses a directive called ion-infinte-scroll . Open the jokes.html and add this directive before the
<ion-infinite-scroll
  ng-if="!noMoreItemsAvailable"
  on-infinite="loadMore(5)"
  distance="10%"
></ion-infinite-scroll>
Now open the controller.js and replace the init function with this snippet.
$scope.lastpage = 1;
$scope.init = function () {
  $scope.lastpage = 1;
  $http({
    url: 'http://localhost:8000/api/v1/jokes',
    method: 'GET',
    params: { page: $scope.lastpage },
  }).success(function (jokes, status, headers, config) {
    $scope.jokes = jokes.data;
    $scope.currentpage = jokes.current_page;
  });
};
$scope.noMoreItemsAvailable = false;
$scope.loadMore = function (limit) {
  console.log('Load More Called');
  if (!limit) {
    limit = 5;
  }

  $scope.lastpage += 1;
  $http({
    url: 'http://localhost:8000/api/v1/jokes',
    method: 'GET',
    params: { limit: limit, page: $scope.lastpage },
  }).success(function (jokes, status, headers, config) {
    console.log(jokes);

    if (jokes.next_page_url == null) {
      $scope.noMoreItemsAvailable = true;
    }

    $scope.jokes = $scope.jokes.concat(jokes.data);
  });
  $scope.$broadcast('scroll.infiniteScrollComplete');
};
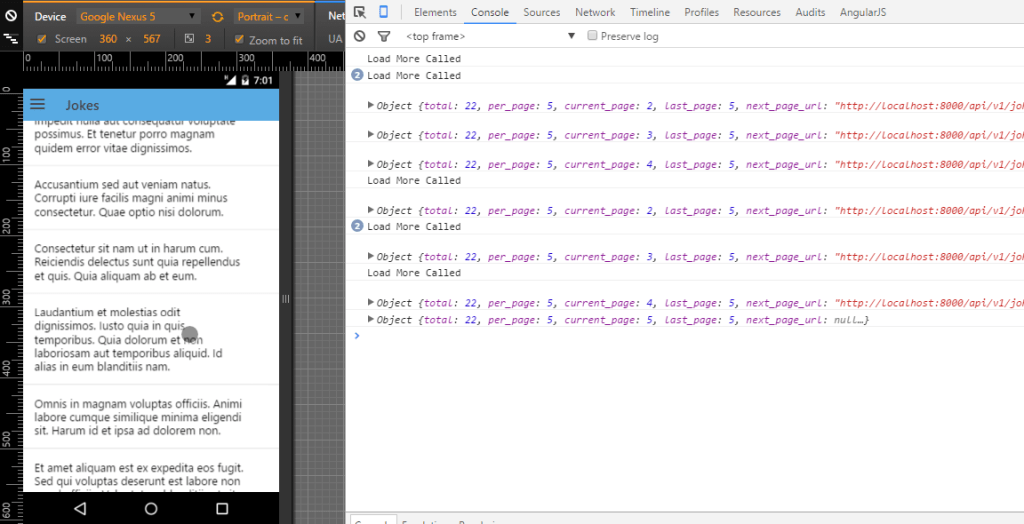
Here you can see in the console. When we scroll down we are loading the data from the server dynamically.
Wrapping Up Tutorial If there are any doubts, you can ask in the comments section below.
Thanks.